Creating your own VGA to RCA cable can be a cost-effective and rewarding project for tech enthusiasts and DIY hobbyists. This guide will walk you through the process, providing detailed instructions, tips, and important considerations to ensure success.
Understanding VGA and RCA Connections
Before diving into the cable-making process, it’s crucial to understand the basics of VGA and RCA connections:
- VGA (Video Graphics Array): A standard connector for computer video output, featuring a 15-pin D-sub connector.
- RCA (Radio Corporation of America): A type of electrical connector commonly used to carry audio and video signals, typically using color-coded cables (yellow for composite video, red for right audio, white for left audio).
Converting VGA to RCA allows you to connect modern computer outputs to older televisions or displays that only support composite video input.
Materials Needed
To create your VGA to RCA cable, you’ll need the following:
- VGA cable (for sacrificing)
- RCA connector (yellow for video)
- Wire strippers
- Soldering iron and solder
- Heat shrink tubing
- Multimeter (for testing connections)
- Small screwdriver
- Electrical tape
Step-by-Step Guide
- Prepare the VGA Cable
- Cut one end of the VGA cable, leaving about 6 inches of wire.
- Carefully strip the outer insulation to expose the individual wires.
- Identify the Correct Wires
- In a standard VGA cable, you’ll need to locate the following wires:
- Pin 1 (Red): Usually red
- Pin 2 (Green): Usually green
- Pin 3 (Blue): Usually blue
- Pin 5 (Ground): Often black or brown
- Use a multimeter to confirm the wire connections if colors are unclear.
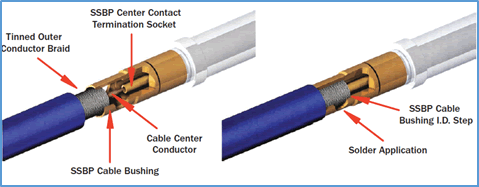
- Prepare the RCA Connector
- If using a screw-type RCA connector, unscrew the outer shell.
- For soldered connectors, prepare the tip and shield sections.
- Connect the Wires
- Twist together the red, green, and blue wires from the VGA cable.
- Solder these combined wires to the center pin of the RCA connector.
- Solder the ground wire to the outer shield of the RCA connector.
- Insulate and Protect
- Slide heat shrink tubing over the soldered connections.
- Use a heat gun or lighter to shrink the tubing, ensuring proper insulation.
- Assemble the Connector
- If using a screw-type RCA connector, carefully reassemble the outer shell.
- For other types, ensure all connections are secure and protected.
- Test the Cable
- Use a multimeter to check for continuity between the VGA pins and RCA connector.
- Ensure there are no short circuits between the center pin and shield.
- Finalize
- Use electrical tape to neatly wrap any exposed areas of the cable.
- Label the cable for future reference.
Important Considerations
- Signal Quality: DIY cables may not provide the same signal quality as professional converters. Expect some loss in video quality.
- Compatibility: Not all VGA outputs are compatible with RCA inputs. Some may require active conversion.
- Audio: This guide focuses on video conversion. For audio, you’ll need separate connections.
Troubleshooting
If your cable doesn’t work as expected:
- Double-check all connections for proper soldering and insulation.
- Verify that your devices support VGA to RCA conversion without additional processing.
- Consider using a commercial VGA to RCA converter for more reliable results.
Alternative Methods
For those less comfortable with soldering, consider these alternatives:
- VGA to RCA Adapter: Purchase a pre-made adapter for a plug-and-play solution.
- VGA to AV Converter Box: For higher quality and more versatile connections, especially for devices that require active signal conversion.
Conclusion
Creating a VGA to RCA cable can be a fun and educational project. While it may not always provide professional-grade results, it’s an excellent way to understand video signal conversion and practice basic electronics skills. For critical applications or if you’re unsure about the DIY process, investing in a commercial converter might be the better option.
Remember, the world of video connections is constantly evolving. As technology progresses, the need for VGA to RCA conversion may decrease. However, understanding these legacy connections can be valuable for working with older equipment or in situations where modern interfaces aren’t available.
By following this guide, you’ve not only learned how to make a VGA to RCA cable but also gained insights into video signal conversion principles. Whether you use this knowledge for practical applications or as a stepping stone to more advanced electronics projects, the skills you’ve acquired will serve you well in future tech endeavors.


0