Although the system usually does a pretty good job detecting new devices, there will be times when particular hardware or peripheral won’t be detected automatically, or you’ll need to configure a wireless device, in which case, you’ll have to add the hardware manually.
In this Windows 10 guide, we’ll walk you through the steps to use the Settings app to quickly add devices (such as mice, keyboards, and printers) to your computer. In addition, we’ll also outline the steps to remove a device, if it’s causing problems or you no longer need it.
How to add a device using Settings
The Settings app offers two ways to add new devices depending on whether you’re setting up a new printer or another peripheral.
Adding hardware and peripherals
To add a new device to your computer (or view a list of the devices already connected), use these steps:
Open Settings.
Click on Devices.
Click on Bluetooth & other devices.
Click the Add Bluetooth or other devices button.

/sites/wpcentral.com/files/styles/large/public/field/image/2019/01/add-device-windows-10.jpg 800w,
/sites/wpcentral.com/files/styles/mediumplus/public/field/image/2019/01/add-device-windows-10.jpg 600w,
/sites/wpcentral.com/files/styles/medium/public/field/image/2019/01/add-device-windows-10.jpg 400w”>
/sites/wpcentral.com/files/styles/large/public/field/image/2019/01/add-device-windows-10.jpg 800w,
/sites/wpcentral.com/files/styles/mediumplus/public/field/image/2019/01/add-device-windows-10.jpg 600w,
/sites/wpcentral.com/files/styles/medium/public/field/image/2019/01/add-device-windows-10.jpg 400w” data-size=”large” sizes=”(min-width: 1110px) 750px, (min-width: 780px) calc(91.58vw – 334px), 100vw” loading=”lazy”>
Quick Tip: If you’re trying to connect a Bluetooth device, make sure to enable “Bluetooth” before trying to connect.
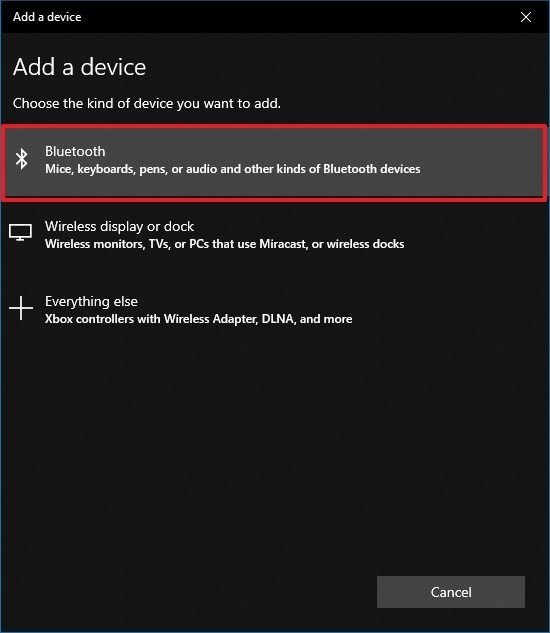
Select the device type that you’re trying to add, including:
Bluetooth — to set up a mouse, keyboard, pen, or wireless speakers.
Wireless display or dock — to set up a wireless display, Miracast, or a wireless dock station.
Everything else — to set up anything that doesn’t fall in the first two options. Some of the devices can include, DLNA devices and Xbox controller with a wireless adapter.
/sites/wpcentral.com/files/styles/large/public/field/image/2019/01/add-bluetooth-windows10.jpg 800w,
/sites/wpcentral.com/files/styles/mediumplus/public/field/image/2019/01/add-bluetooth-windows10.jpg 600w,
/sites/wpcentral.com/files/styles/medium/public/field/image/2019/01/add-bluetooth-windows10.jpg 400w”>
/sites/wpcentral.com/files/styles/large/public/field/image/2019/01/add-bluetooth-windows10.jpg 800w,
/sites/wpcentral.com/files/styles/mediumplus/public/field/image/2019/01/add-bluetooth-windows10.jpg 600w,
/sites/wpcentral.com/files/styles/medium/public/field/image/2019/01/add-bluetooth-windows10.jpg 400w” data-size=”large” sizes=”(min-width: 1110px) 750px, (min-width: 780px) calc(91.58vw – 334px), 100vw” loading=”lazy”>
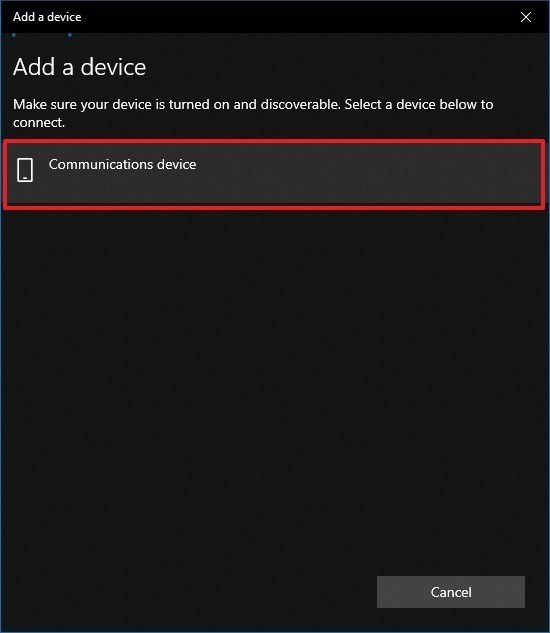
Select the device from the discovery list.
/sites/wpcentral.com/files/styles/large/public/field/image/2019/01/bluetooth-dicovery-windows10.jpg 800w,
/sites/wpcentral.com/files/styles/mediumplus/public/field/image/2019/01/bluetooth-dicovery-windows10.jpg 600w,
/sites/wpcentral.com/files/styles/medium/public/field/image/2019/01/bluetooth-dicovery-windows10.jpg 400w”>
/sites/wpcentral.com/files/styles/large/public/field/image/2019/01/bluetooth-dicovery-windows10.jpg 800w,
/sites/wpcentral.com/files/styles/mediumplus/public/field/image/2019/01/bluetooth-dicovery-windows10.jpg 600w,
/sites/wpcentral.com/files/styles/medium/public/field/image/2019/01/bluetooth-dicovery-windows10.jpg 400w” data-size=”large” sizes=”(min-width: 1110px) 750px, (min-width: 780px) calc(91.58vw – 334px), 100vw” loading=”lazy”>
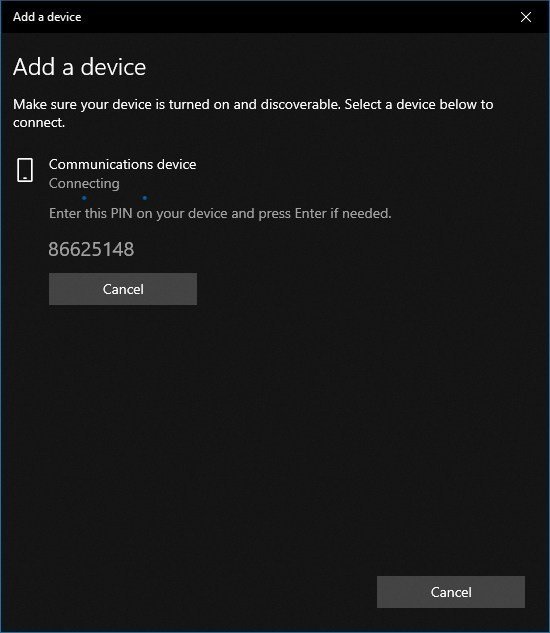
Continue with the easy on-screen directions to complete the setup.
/sites/wpcentral.com/files/styles/large/public/field/image/2019/01/connecting-bluetooth-devices-windows10.jpg 800w,
/sites/wpcentral.com/files/styles/mediumplus/public/field/image/2019/01/connecting-bluetooth-devices-windows10.jpg 600w,
/sites/wpcentral.com/files/styles/medium/public/field/image/2019/01/connecting-bluetooth-devices-windows10.jpg 400w”>
/sites/wpcentral.com/files/styles/large/public/field/image/2019/01/connecting-bluetooth-devices-windows10.jpg 800w,
/sites/wpcentral.com/files/styles/mediumplus/public/field/image/2019/01/connecting-bluetooth-devices-windows10.jpg 600w,
/sites/wpcentral.com/files/styles/medium/public/field/image/2019/01/connecting-bluetooth-devices-windows10.jpg 400w” data-size=”large” sizes=”(min-width: 1110px) 750px, (min-width: 780px) calc(91.58vw – 334px), 100vw” loading=”lazy”>
Once you’ve completed the steps, the system will install the correct driver and configure the device, and you should be able to use it without additional steps.
Adding printers
Although printers fall into the hardware and peripherals category, Windows 10 includes a separate experience to install printers and scanners.
To add a new printer or scanner, make sure the device is turned on and connected, and do the following:
Open Settings.
Click on Devices.
Click on Printers & scanners.
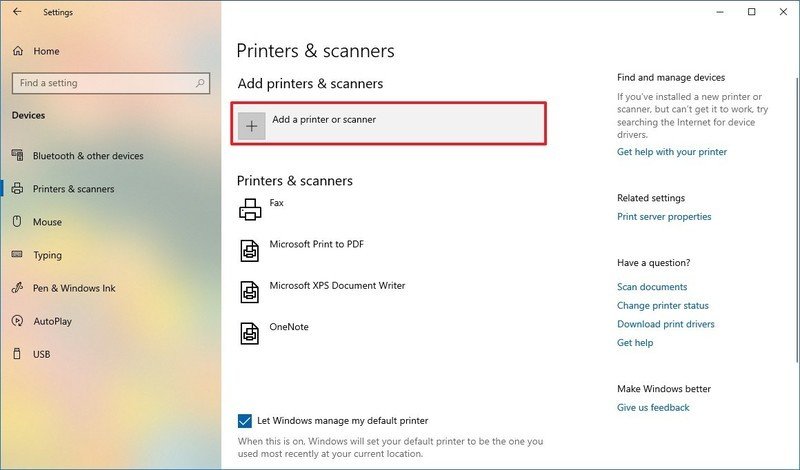
Click the Add a printer or scanner button.
/sites/wpcentral.com/files/styles/large/public/field/image/2019/01/add-printer-scanner-windows-10.jpg 800w,
/sites/wpcentral.com/files/styles/mediumplus/public/field/image/2019/01/add-printer-scanner-windows-10.jpg 600w,
/sites/wpcentral.com/files/styles/medium/public/field/image/2019/01/add-printer-scanner-windows-10.jpg 400w”>
/sites/wpcentral.com/files/styles/large/public/field/image/2019/01/add-printer-scanner-windows-10.jpg 800w,
/sites/wpcentral.com/files/styles/mediumplus/public/field/image/2019/01/add-printer-scanner-windows-10.jpg 600w,
/sites/wpcentral.com/files/styles/medium/public/field/image/2019/01/add-printer-scanner-windows-10.jpg 400w” data-size=”large” sizes=”(min-width: 1110px) 750px, (min-width: 780px) calc(91.58vw – 334px), 100vw” loading=”lazy”>
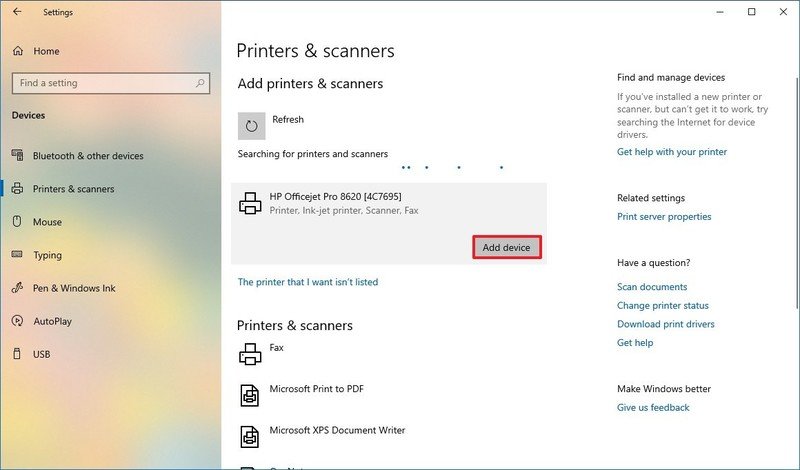
Select the device from the list, and click the Add device button.
/sites/wpcentral.com/files/styles/large/public/field/image/2019/01/install-printer-settings-windows-10.jpg 800w,
/sites/wpcentral.com/files/styles/mediumplus/public/field/image/2019/01/install-printer-settings-windows-10.jpg 600w,
/sites/wpcentral.com/files/styles/medium/public/field/image/2019/01/install-printer-settings-windows-10.jpg 400w”>
/sites/wpcentral.com/files/styles/large/public/field/image/2019/01/install-printer-settings-windows-10.jpg 800w,
/sites/wpcentral.com/files/styles/mediumplus/public/field/image/2019/01/install-printer-settings-windows-10.jpg 600w,
/sites/wpcentral.com/files/styles/medium/public/field/image/2019/01/install-printer-settings-windows-10.jpg 400w” data-size=”large” sizes=”(min-width: 1110px) 750px, (min-width: 780px) calc(91.58vw – 334px), 100vw” loading=”lazy”>
After completing the steps, the printer will install automatically, and you should be able to print from any application.
How to remove a device using Settings
On Windows 10, you can also use the Settings app to quickly remove any device:
Removing hardware and peripherals
To remove a piece of hardware or peripheral from your computer, use these steps:
Open Settings.
Click on Devices.
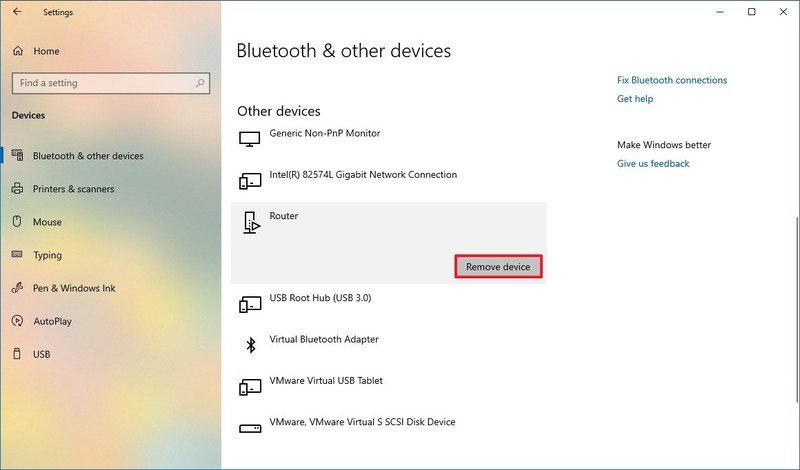
Click on Bluetooth & other devices.
Select the device that you no longer need.
Click the Remove device button.
/sites/wpcentral.com/files/styles/large/public/field/image/2019/01/remove-device-windows-10.jpg 800w,
/sites/wpcentral.com/files/styles/mediumplus/public/field/image/2019/01/remove-device-windows-10.jpg 600w,
/sites/wpcentral.com/files/styles/medium/public/field/image/2019/01/remove-device-windows-10.jpg 400w”>
/sites/wpcentral.com/files/styles/large/public/field/image/2019/01/remove-device-windows-10.jpg 800w,
/sites/wpcentral.com/files/styles/mediumplus/public/field/image/2019/01/remove-device-windows-10.jpg 600w,
/sites/wpcentral.com/files/styles/medium/public/field/image/2019/01/remove-device-windows-10.jpg 400w” data-size=”large” sizes=”(min-width: 1110px) 750px, (min-width: 780px) calc(91.58vw – 334px), 100vw” loading=”lazy”>
Click the Yes button to confirm.
Once you’ve completed the steps, Windows 10 will remove the device, and you’ll no longer be able to use it.
Removing printers
If you need to remove a printer, the steps are slightly different:
Open Settings.
Click on Devices.
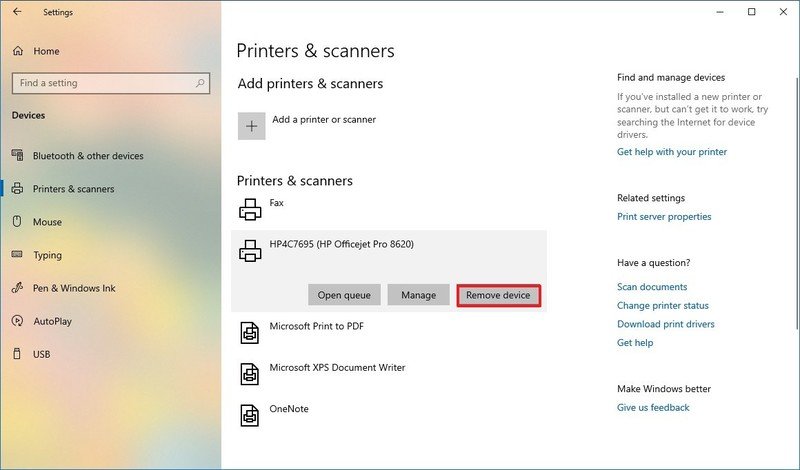
Click on Printers & scanners devices.
Select the printer that you no longer need.
Click the Remove device button.
/sites/wpcentral.com/files/styles/large/public/field/image/2019/01/uninstall-printer-windows-10.jpg 800w,
/sites/wpcentral.com/files/styles/mediumplus/public/field/image/2019/01/uninstall-printer-windows-10.jpg 600w,
/sites/wpcentral.com/files/styles/medium/public/field/image/2019/01/uninstall-printer-windows-10.jpg 400w”>
/sites/wpcentral.com/files/styles/large/public/field/image/2019/01/uninstall-printer-windows-10.jpg 800w,
/sites/wpcentral.com/files/styles/mediumplus/public/field/image/2019/01/uninstall-printer-windows-10.jpg 600w,
/sites/wpcentral.com/files/styles/medium/public/field/image/2019/01/uninstall-printer-windows-10.jpg 400w” data-size=”large” sizes=”(min-width: 1110px) 750px, (min-width: 780px) calc(91.58vw – 334px), 100vw” loading=”lazy”>
Click the Yes button to confirm.
After completing the steps, Windows 10 will remove the printer completely from your computer.
More Windows 10 resources
For more helpful articles, coverage, and answers to common questions about Windows 10, visit the following resources: